User Guide
HomeChef-Helper (HomeChef) is a simple, intuitive desktop app for managing orders and payments for any self-made food business owners!
From new cooks with no experience managing their orders, to expert home food business owners with extensive knowledge, the app helps to consolidate the order and food information in an easy to read format, helping you get things done faster!
With a simple typing interface and a clear order list and food menu, this app is here to help you manage orders quick if you can type fast.
- Looking to get started?
Here’s a quick guide: -
Features
-
Order List commands:
- Adding an order:
add - Listing all orders :
list - Marking an order as in progress:
inprogress - Marking an order as complete:
complete - Marking an order as pending:
pending - Marking an order as paid:
paid - Marking an order as partially paid:
partial - Marking an order as unpaid:
unpaid - Generating a receipt:
receipt - Editing an order :
edit - Deleting an order :
delete - Clearing all entries :
clear
- Adding an order:
- Menu commands:
- Other commands:
-
Order List commands:
- FAQ
- Known issues
- Command summary
Looking to get started?
Here’s a quick guide:
-
Ensure you have Java
17or above installed in your Computer.
A tutorial on how to download Java17can be found here.
Mac users: Ensure you have the precise JDK version prescribed here. -
Download the latest
.jarfile from here.
Only the.jarfile is needed, not the source code. -
Copy the file to the folder you want to use as the home folder for your HomeChef.
- Double-click on the
homechef.jarfile to launch the app.
If that does not work, try the following:- Open a command terminal.
(Command Prompt or Powershell on Windows, Terminal on Mac)
- Use the
cdcommand to navigate into the folder you put the jar file in.
For example:
cd Desktop/Folder1/FolderContainingHomeChef
- Type the
java -jar homechef.jarcommand to run the application.
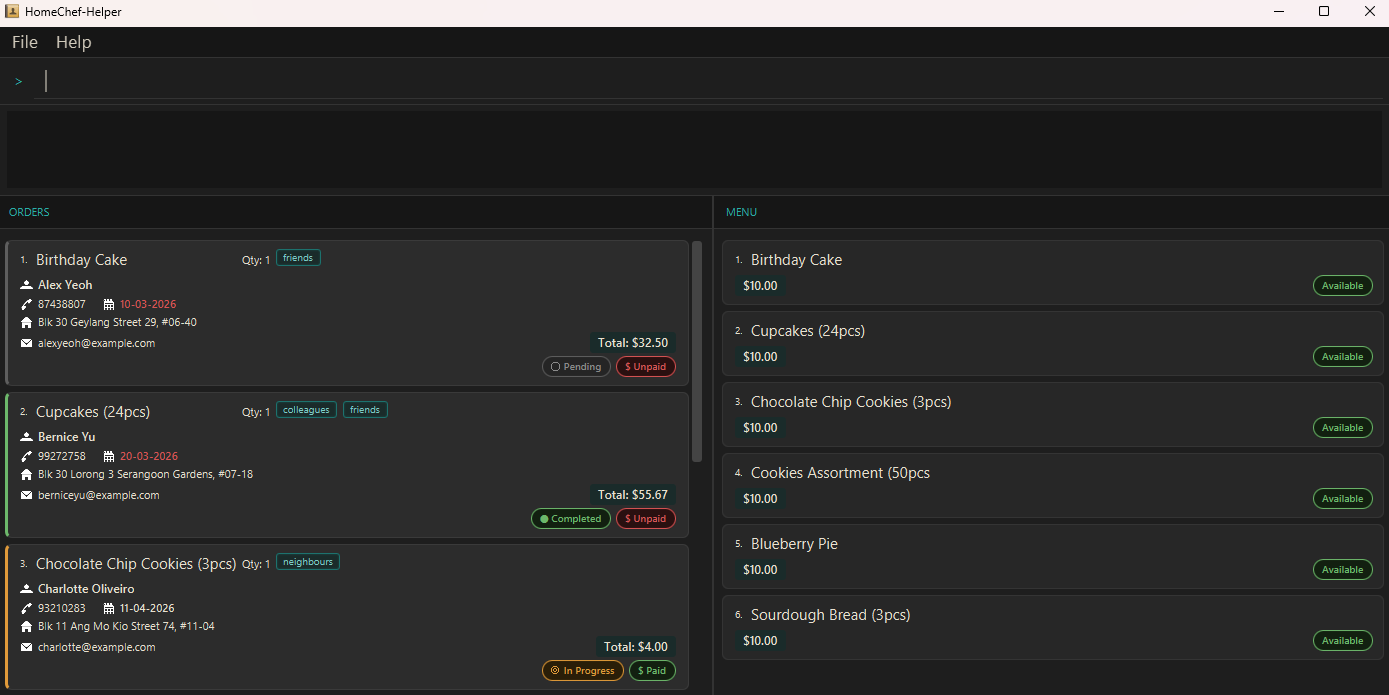
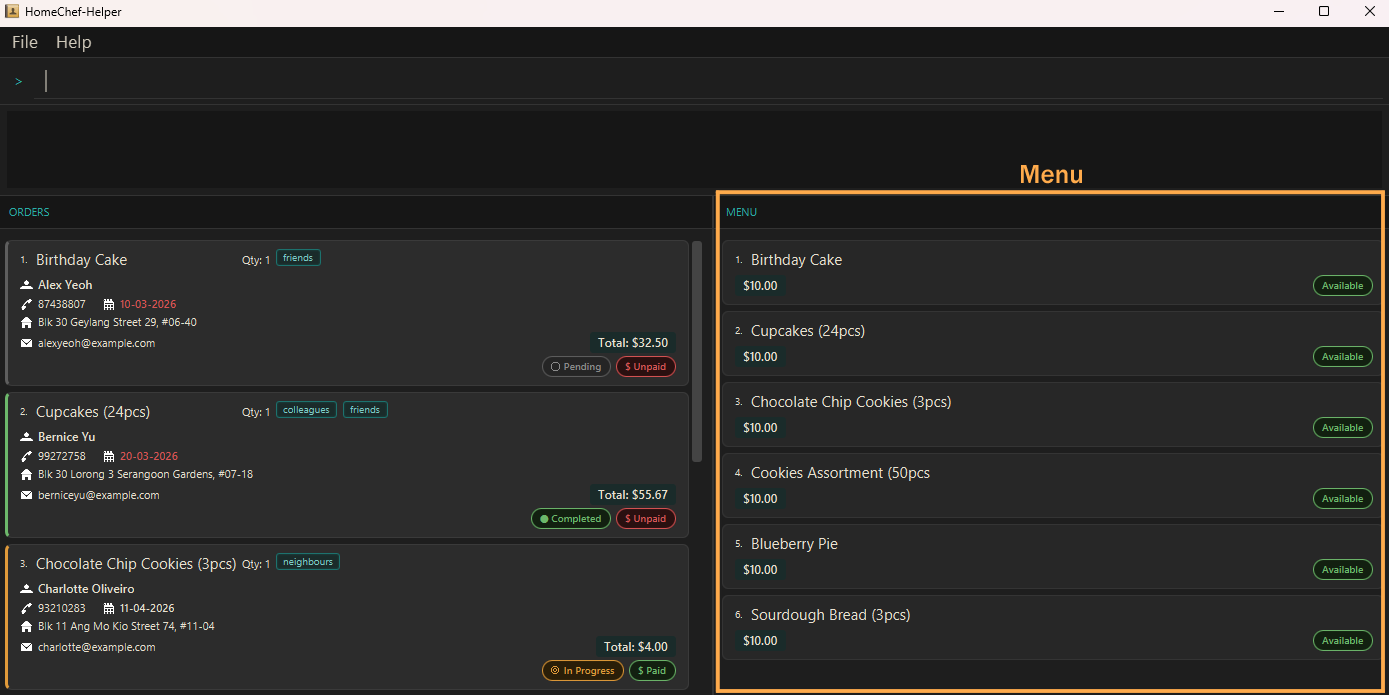
If successful, a screen similar to the one below should appear in a few seconds. The app contains some sample data for you to get an idea of how it functions.
- Open a command terminal.
-
Type the command in the command box and press Enter to execute it. e.g. typing
helpand pressing Enter will open the help window.
Some example commands you can try:-
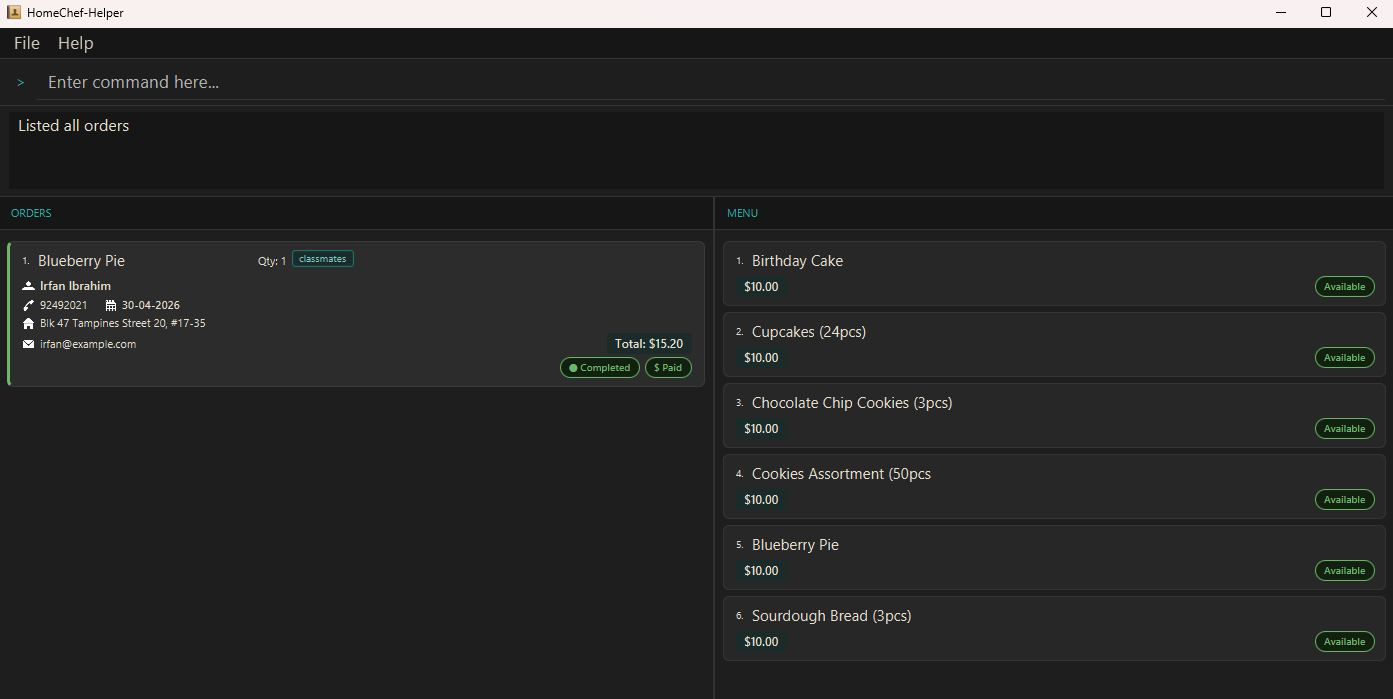
list: Lists all orders. Good for resetting the display to show a full view of all orders you have. -
list f/cake: Lists all orders with “cake” in the food’s name. Good for finding orders of a similar type, or sharing the same customer. -
add f/Birthday Cake c/John Doe p/1234 e/johnd@example.com a/John street, block 123, #01-01 d/30-03-2026:
Adds an order namedBirthday Cakewith customer nameJohn Doeto HomeChef. Price is taken from the menu automatically.
The newly added order should look like this:
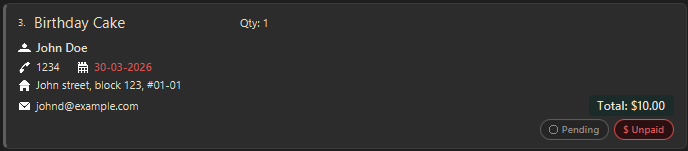
Note that the ID number may defer if there are other orders in the list.
The date may also be of a different colour (red or orange) if the current date is after 30-03-2026. -
complete 1: Marks the 1st order shown in the current list as completed. Helps to show what orders you have done at a glance! -
delete 3: Deletes the 3rd order shown in the current list. Perfect for removing long completed orders that you won’t refer to anymore. -
add-menu n/Potato Wedges $/2.20: Adds a food item calledPotato Wedgeswith a price of$2.20into the menu on the right.
The newly added menu item should look like this:

-
exit: Exits the app. See you next time!
-
- Do refer to the Features below for details of each command.
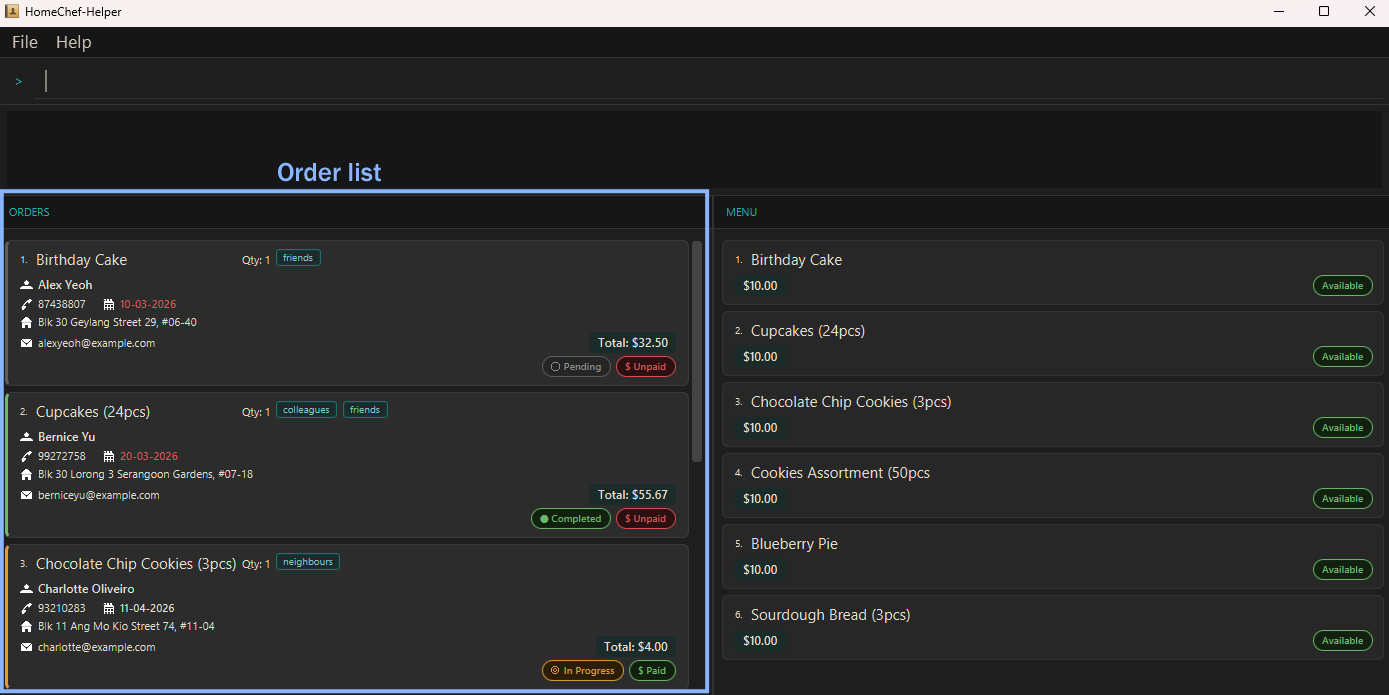
Features
![]() Notes about the command format:
Notes about the command format:
-
Words in
UPPER_CASEare the parameters to be supplied by the user.
e.g. inadd f/FOOD,FOODis a parameter which can be used asadd f/Chocolate Cake. -
INDEXvalues can only be non-zero positive whole numbers. Any inputINDEXthat is0, negative or a decimal will give an error message.
e.g.0,-1and2.0will giveInvalid command formaterror messages. -
INDEXvalues cannot be larger than the size of the shown list.
e.g. With an order list of size3, inputtingINDEXas4or more will give an error message sayingThe order index provided is invalid. -
INDEXvalues refer to the index number shown in the displayed order list.
e.g. A list may originally be of size 10, so5is a validINDEX. Usinglist f/Cakeshortens the displayed list to a size of 3. This makes5an invalidINDEXnow. -
Items in square brackets are optional.
e.gf/FOOD [t/TAG]can be used asf/Butter Cake t/no dairyor asf/Butter Cake. -
Any items not in the square brackets are thus mandatory.
If any of the mandatory fields are missing, anInvalid command formaterror message will be shown.
e.g.f/FOOD [t/TAG]will give an error message if onlyt/no dairyis given. -
Items with
… after them can be used multiple times including zero times.
e.g.[t/TAG]…can be used ast/no peanuts,t/gluten-free t/extra sprinklesetc. -
Parameters can be in any order.
e.g. if the command specifiesf/FOOD p/PHONE,p/PHONE f/FOODis also acceptable. -
Extra parameters for commands that do not take in parameters (such as
help,exitandclear) will be ignored.
e.g. if the command specifieshelp 123, it will be interpreted ashelp. -
If you are using a PDF version of this document, be careful when copying and pasting commands that span multiple lines as space characters surrounding line-breaks may be omitted when copied over to the application.
Order List commands:
The order list is the list on the left, showing all the orders made by customers for certain food items.
The following are the commands that interact with this order list.
Adding an order: add
Adds an order to the order list. All orders are initially set as ‘Pending’ and ‘Unpaid’.
Format: add f/FOOD c/NAME p/PHONE e/EMAIL a/ADDRESS d/DATE [q/QUANTITY] [t/TAG]…
[m/PAYMENT METHOD] [r/PAYMENT REF] [b/BANK NAME] [w/WALLET PROVIDER]
- Orders have their completion status set to
Pendingby default. - Orders also have their payment status set to
Unpaidby default. - Orders have their dates coloured according to the urgency of the Order.
White indicates that the
Orderis not late, it is due more than 3 days from today’s date.

Orange indicates that theOrderis not late, but it is due within 3 days of today’s date.

Red indicates that theOrderis late, it was due before today’s date.

*
FOOD must match an existing food’s name in the current menu exactly.
* Giving an input that is not in the menu will show an error message telling you to Use 'add-menu' to add it to the menu first.
* The order’s price is automatically taken from the matching menu item. Use add-menu or edit-menu to update a food’s price.
* QUANTITY specifies how many units of the food item are ordered.
* If omitted, QUANTITY defaults to 1.
* The total order price is calculated as PRICE x QUANTITY.
* QUANTITY must be a positive integer between 1 and 999 (inclusive). Any other value will show an error message.
* An order can have any number of dietTags (including 0)
Examples:
add f/Red Bean Bun c/John Doe p/98765432 e/johnd@example.com a/John street, block 123, #01-01 d/30-03-2026add f/Hawaiian Pizza c/Betsy Crowe t/Halal e/betsycrowe@example.com a/Newgate Prison p/1234567 d/12-12-2026 t/No peanutsadd f/Bananas c/Monkey p/80801414 t/An actual monkey e/ooaa@ananab.com a/Monkey Village m/Bank r/123456789 b/Monkey Bank d/18-03-2026-
add f/Nasi Lemak q/3 c/John p/91234567 e/john@example.com a/123 Street d/01-12-2024Adds an order of3units ofNasi Lemak. The total price shown will be the menu price multiplied by3.
Listing all orders : list
Shows a list of all orders in the order list when no parameters are given, Otherwise, shows a filtered list of orders that match the keywords given as parameters. This can be useful for finding orders specific to a certain customer, a certain address or even of a certain food name.
Format: list [d/DATE] [c/CUSTOMER] [f/FOOD] [p/PHONE] [cs/COMPLETION STATUS] [ps/PAYMENT STATUS]
* Lists all orders when no parameters are given. * Filters are case-insensitive for
c/, f/ and p/.
* DATE must be in the format dd-MM-yyyy.
* COMPLETION_STATUS must be one of Pending, In progress or Completed.
* PAYMENT_STATUS must be one of Paid, Unpaid or Partial.
* Using list with no parameters is a good way to reset the order list view to show every order stored.
* A common list command is list cs/Pending ps/Paid to easily find orders that should be started on, since they have already been paid.
* Another common command is list cs/Completed ps/Unpaid to find orders that have been completed but not yet paid, to track troublesome customers who have yet to pay for their food.
Examples:
-
listDiplays the full order list. -
list d/18-10-2026Displays an order list with all orders which have the date18-10-2026. -
list p/1234Displays an order list with all orders with phone numbers that have1234in them. -
list d/16-04-2003 c/alice f/cake p/1234Displays an order list with all orders that have the date16-04-2003, havealicein the customer’s name, havecakein the food’s name and have1234in the phone number. -
list cs/Completed ps/PaidDisplays an order list with all orders that areCompletedandPaid.
Marking an order as in progress: inprogress
Sets the completion status of an order to ‘In progress’. In progress orders have their completion status coloured orange. This helps to easily tell at a glance when an order is currently in progress.
- On an in progress order, the completion status will not be changed.
Format: inprogress INDEX
Marking an order as complete: complete
Sets the completion status of an order to ‘Completed’. Completed orders have their completion status coloured green. This helps to easily tell at a glance when an order is completed.
- On a completed order, the completion status will not be changed.
Format: complete INDEX
Marking an order as pending: pending
Sets the completion status of an order to ‘Pending’. Pending orders have their completion status coloured dark grey. This helps to easily tell at a glance when an order has yet to be worked on.
- On a pending order, the completion status will not be changed.
Format: pending INDEX
Marking an order as paid: paid
Sets the payment status of an order to ‘Paid’. Paid orders have their payment status coloured green. This helps to easily tell at a glance when an order has been totally paid for by a customer.
- On a paid order, the completion status will not be changed.
Format: paid INDEX
Marking an order as partially paid: partial
Sets the payment status of an order to ‘Partial’. Partially paid orders have their payment status coloured yellow. This helps to easily tell at a glance when an order has been partially paid for by a customer.
- On a partially paid order, the completion status will not be changed.
Format: partial INDEX
Marking an order as unpaid: unpaid
Sets the payment status of an order to ‘Unpaid’. Unpaid orders have their payment status coloured red. This helps to easily tell at a glance when an order has yet to be paid by a customer.
- On an unpaid order, the completion status will not be changed.
Format: unpaid INDEX
Generating a receipt: receipt
Generates a plain-text receipt file for the specified order.
Format: receipt INDEX
- A receipt file is created in a
receiptsfolder beside the HomeChef data file.
rec.
Examples:
-
receipt 1Prints a receipt for the order located atINDEX1 of the shown list. -
rec 2Prints a receipt for the order located atINDEX2 of the shown list.
Editing an order : edit
Edits an existing order in the order list. This helps with updating orders when information changes, without having to delete and re-add the order to the list.
edit command and must be modified using the above commands.
Format:
edit INDEX [f/FOOD] [c/NAME] [p/PHONE] [e/EMAIL] [a/ADDRESS] [d/DATE] [t/TAG]…
[m/PAYMENT METHOD] [r/PAYMENT REF] [b/BANK NAME] [w/WALLET PROVIDER]
* At least one of the optional fields must be provided. * If no fields are provided, a message will appear telling you to provide a field. * Existing values will be updated to the input values. * If
f/FOOD is changed, the order’s price is automatically updated to match the new menu item’s price.
* When editing dietTags, the existing dietTags of the order will be removed i.e adding of dietTags is not cumulative.
* You can remove all the order’s dietTags by typing t/ without
specifying any dietTags after it.
Examples:
-
edit 1 p/91234567 e/johndoe@example.comEdits the phone number and email address of the 1st order to be91234567andjohndoe@example.comrespectively. -
edit 2 c/Betsy Crower t/Edits the name of the 2nd order’s customer to beBetsy Crowerand clears all existing dietTags. -
edit 1Shows an error message sayingAt least one field to edit must be provided.
Deleting an order : delete
Deletes the specified order.
Format: delete INDEX
- Deletes the order at the specified
INDEX. - The index refers to the index number shown in the displayed order list.
- The index must be a positive integer 1, 2, 3, …
Examples:
-
listfollowed bydelete 2deletes the 2nd order in the current list. -
list c/Betsyfollowed bydelete 1deletes the 1st order in the filtered results.
Clearing all entries : clear
If not, use the delete command instead.
Clears all entries from the order list.
Format: clear
Menu commands:
The menu is the list on the right, indicating the food items you have for sale.
The following are the commands that interact with this menu.
![]() Notes about the menu:
Notes about the menu:
- Any modifications to the menu will not affect existing orders.
- For example: There is an order with a food name
Birthday Cake. Deleting or editingBirthday Cakein the menu will not affect this existing order.
But future orders will not be able to add food calledBirthday Cakeas it now does not exist in the menu. - This is so that you can freely change the menu without affecting past orders. After all, if someone ordered bread but one year later you switched to cooking noodles, that old order should still be retained for recording purposes!
- For example: There is an order with a food name
Adding a food item : add-menu
Adds a food item of the given name, price and availability to the menu.
Format: add-menu n/NAME $/PRICE [v/AVAILABILITY]
![]() Notes about the add-menu command:
Notes about the add-menu command:
-
PRICEis a non-negative number up to 2 decimal places. Having less than 2 decimals is accepted.- Giving an input that is not a number or a number with more than 2 decimals will cause an error message to appear telling you the correct format you should use.
- Similar functionality to that of
addfor the order list, except the fields have different prefixes. -
AVAILABILITYonly acceptstrueorfalsespelled exactly.- Typing anything else will give an error message stating
Availability must be 'true' or 'false'.
- Typing anything else will give an error message stating
- If not specified,
AVAILABILITYwill be set asAvailable.
Examples:
-
add-menu n/Bee Hoon $/5Adds a food item calledBee Hooninto the menu with a price of$5and is specified asAvailable. -
add-menu n/Mee Goreng $/6.00 v/falseAdds a food item calledMee Gorenginto the menu with a price of$6.00and is specified isUnavailable.
Deleting a food item : delete-menu
Deletes the food item identified by the index number used in the displayed menu list.
Format: delete-menu INDEX
Editing a food item : edit-menu
Edits an existing food item in the menu.
Similar functionality to that of edit for the order list, except the fields have different prefixes.
Format: edit-menu INDEX [n/NAME] [$/PRICE] [v/AVAILABILITY]
![]() Notes about the edit-menu command:
Notes about the edit-menu command:
-
AVAILABILITYonly acceptstrueorfalsespelled exactly.-
- Typing anything else will give an error message stating
Availability must be 'true' or 'false'.
- Typing anything else will give an error message stating
</div>
-
Example:
-
edit-menu 1 n/Raisin Cookies $/2.00Edits the food in the first position of the displayed menu to have the nameRaisin Cookiesand a price of$2.00. -
edit-menu 2 n/Pain au Chocolat $/3.50 v/falseEdits the food in the second position of the displayed menu to have the namePain au Chocolatand a price of$3.50.
Other commands:
Viewing help : help
Shows a message explaining how to access the help page.

Format: help
Exiting the program : exit
Exits the program.
Format: exit
- You can also exit the program by using your mouse cursor and clicking on the dropdown tab labelled
Fileand then clicking onExit.
Saving the data
HomeChef data is saved in the hard disk automatically after any command that changes the data. There is no need to save manually.
data folder when needed, such as when a clear command is accidentally executed.
Editing the data file
HomeChef data is saved automatically as a JSON file [JAR file location]/data/homechef.json. Advanced users are welcome to update data directly by editing that data file.
Furthermore, certain edits can cause the HomeChef to behave in unexpected ways (e.g., if a value entered is outside of the acceptable range). Therefore, edit the data file only if you are confident that you can update it correctly.
FAQ
Q: How do I transfer my data to another Computer?
A: Download the app in the other computer and set it up as mentioned in the Quick Guide section above.
Overwrite the empty data file it creates with the file that contains the data of your previous HomeChef home folder (the homechef.json and menu.json files).
Q: How do I get back the sample data that the app came with when I first booted it up?
A: Open the folder that contains homechef.jar. Simply delete the homechef.json and menu.json files located in the data folder. The next time you open the app, all the original sample orders and menu items will be restored.
Q: What’s the rectangular box below where I put in the commands?
A: That’s the status window! It tells you if the commands you type in are typed correctly, and if it is executed properly. It also gives suggestions and hints if you input commands incorrectly.
If the status information given is still unclear, feel free to refer to the command information above.
Q: The order list is blank! Is my data all gone?
A: This may not necessarily be the case. Check by using the list command with no parameters. This should reset the order list to its default view, which includes every single order that has been added. If this still fails to resolve the problem, see the next question.
Q: Help! My data all been deleted!
A: Unfortunately, yes. There is no way to recover the data unless a backup copy was made of the homechef.json and menu.json files.
If the copies exist, copy them over to the data folder located in the folder that contains the jar file you downloaded.
Known issues
-
When using multiple screens, if you move the application to a secondary screen, and later switch to using only the primary screen, the GUI will open off-screen. The remedy is to delete the
preferences.jsonfile created by the application before running the application again. -
If you minimize the Help Window and then run the
helpcommand (or use theHelpmenu, or the keyboard shortcutF1) again, the original Help Window will remain minimized, and no new Help Window will appear. The remedy is to manually restore the minimized Help Window.
Command summary
| Action | Format, Examples |
|---|---|
| Add |
add f/FOOD c/NAME p/PHONE_NUMBER e/EMAIL a/ADDRESS d/DATE [q/QUANTITY] [t/TAG]… [m/PAYMENT METHOD] [r/PAYMENT REF] [b/BANK NAME] [w/WALLET PROVIDER] e.g., add f/Chicken Rice c/James Ho p/22224444 e/jamesho@example.com a/123, Clementi Rd d/30-03-2026
|
| List |
list [d/DATE] [c/CUSTOMER] [f/FOOD] [p/PHONE] [cs/COMPLETION_STATUS] [ps/PAYMENT_STATUS]e.g., list d/18-10-2026 cs/completed ps/Paid
|
| Mark In Progress |
inprogress INDEX e.g., inprogress 2
|
| Mark Complete |
complete INDEX e.g., complete 4
|
| Mark Pending |
pending INDEX e.g., pending 3
|
| Mark Paid |
paid INDEX e.g., paid 1
|
| Mark Partial |
partial INDEX e.g., partial 1
|
| Mark Unpaid |
unpaid INDEX e.g., unpaid 1
|
| Edit |
edit INDEX [f/FOOD] [n/NAME] [p/PHONE_NUMBER] [e/EMAIL] [a/ADDRESS] [t/TAG]… [m/PAYMENT METHOD] [r/PAYMENT REF] [b/BANK NAME] [w/WALLET PROVIDER]e.g., edit 2 n/James Lee e/jameslee@example.com
|
| Delete |
delete INDEXe.g., delete 3
|
| Clear | clear |
| Add Menu |
add-menu n/NAME $/PRICE [v/AVAILABILITY] e.g., add-menu n/Bee Hoon $/5.00 v/true
|
| Delete Menu |
delete-menu INDEXe.g., delete 3
|
| Edit Menu |
edit-menu INDEX [n/NAME] [$/PRICE] [v/AVAILABILITY] e.g., edit-menu 2 n/Pain au Chocolat $/3.50 v/true
|
| Help | help |
| Exit | exit |